Configuring our Unreal project to precompile PSOs

Before we begin, we have configured our project settings to enable the shader pipeline cache with r.ShaderPipelineCache.Enabled in the device profiles window.
For more information, my personal blog has a post that covers configuring this feature.
Onto actually implementing PSO at start up. For this project, we're going to just halt on the title screen until the shaders are compiled.
Set Up
To precompile all of our shaders before the game starts, we want a few things.
Firstly, we want a lightweight title screen. If our title screen is too heavy on shaders, we'll have to pause before we can even start rendering the title screen. If we want a heavier screen, we may want to save it for the menu.
Secondly, we want to configure the shader pipeline cache to precompile on start up with r.ShaderPipelineCache.PreOptimizeEnabled. We don't need this, and it's easy to flip the pipeline into precompile mode in code anyway.
Thirdly, we want a widget that displays a progress bar. Players will probably be slightly confused if the game seemingly freezes for a long period of time.
Widget
For the widget, we're going to create a new User Widget.
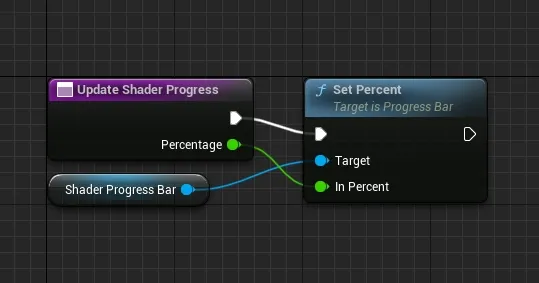
In this widget, I've placed a progress bar across the bottom and created a small function that I can call to update its percentage.
We need to add this to viewport in our title screen, and that's done with a call to Add to Viewport in blueprint.

Don't worry to much about the use of player index 0 here, it's the first screen and I'm not in a networked environment at this point.
Be sure to promote the widget created by Create UI Shader Bar Widget to a variable as we'll use the reference later to update the percent.
PSO
For this portion, we need to delve into C++. I'm not aware of blueprint calls that can achieve what we want out-of-the-box.
When you want to precompile everything, I recommend you set MaxPrecompileTime to some non-zero number for testing. When waiting on FShaderPipelineCache::NumPrecompilesRemaining(), the returned value is based on an interpolation from the opening of the cache to MaxPrecompileTime. This essentially leads to the compile always taking MaxPrecompileTime when used this way. For actual use in a title, you may want to set max time to zero and rely on the NumPrecompilesRemaining function to check when the compilation is finished.
Before I cover that, let's discuss a thorny issue with PSO caching. As far as I can tell, if another, new PSO is discovered during PSO compilation, the current compilation will halt if MaxPrecompileTime is greater than zero. If you do things correctly during the PSO logging process, you might not notice this as the .psc file will contain the shaders it needs.
If, however, you retrofit a title screen onto a game that was already doing PSO without renewing the cache, that screen might log a new PSO and the halt the process. Bare in mind that I specifically waiting until I have 0 shaders left to compile before I load the menu.
You can get around this issue with a quick r.ShaderPipelineCache.Open or r.ShaderPipelineCache.MaxPrecompileTime 0 to continue, so it's not insurmountable, but it is slightly annoying. If you're wanting to generate PSOs for the run, use the latter. I'm not sure if things will write back correctly if we reopen the cache.
And as a second note: my test project launcher profile doesn't appear to want to actually pass -logpso to the executable, or rather, it passes it, and it has no effect. I used cmd to set the level and pass the PSO argument, which does activate PSO logging. It also unsticks the halting issue above, so you probably won't need to issue the workaround commands.
Anyway, let's get to actually setting it up.
Unreal doesn't, as far as I know, have a way to expose the state of compilation to blueprint. We want it in blueprint to drive the UI, it's just easier that way. What we really want is a blueprint node that fires when updates occurs.
Now, there is a class in Unreal called UBlueprintAsyncActionBase that I've used to implement the blueprint bindings. We want the asynchronous nature of this type of node as we want to avoid stalling the game thread. As an aside, we probably also want to set a 30-fps limit for this menu, there's little happening and we have no reason to go crazy with GPU load.
The code below is a variant of what I'm using to wait for the game to finish precompilation. Our waiting loop is implemented in WaitForBatch using the timer manager. If we did compile more shaders, we call an OnUpdate callback, and if we finish compilation, we call an OnComplete callback.
FShaderPipelineCache::SetBatchMode(FShaderPipelineCache::BatchMode::Precompile);
if (FShaderPipelineCache::IsBatchingPaused())
{
	FShaderPipelineCache::ResumeBatching();
}

// Wait for X shaders to compile, unless we got a zero
if ((-1 == MaxShaders || MaxShaders > 0) && World)
{
	ReferenceCurrentShaders = FShaderPipelineCache::NumPrecompilesRemaining();

	if (0 == ReferenceCurrentShaders)
	{
		// Don't trip update callback
		ExecuteCompleted(0);
		return;
	}

	World->GetTimerManager().SetTimer(StepHandler, this, &UPSOLevelLoadHelper::WaitForBatch, 0.35f, true);
	return;
}
In our timer manager call, the 0.35f specifies that we wait for 350ms between the calls to WaitForBatch. This delay is a bit longer than I'd roll for trying to ship something, but it works for testing. We could have this update fire at 0.033f – 33ms – to line it up better with the frame rate, but it won't be perfect.
A better way to have the update sync to the framerate is to use ...SetTimerForNextTick(). This solution also scales, but it does require resetting the timer in WaitForBatch as next tick only triggers once. The flip-side of this requirement is that SetTimer requires that we clear the timer when we complete the compilation.
In my code, the removal of the timer is handled in ExecuteCompleted, which also calls the OnComplete callback and calls SetReadyToDestroy(). The latter is required for proper operation of the async node class.
r.D3D12.PSO.DiskCache nor r.D3D12.PSO.DriverOptimizedDiskCache that get mentioned appear to exist at present.